
Have you ever wondered how to transform your outdoor space into a thriving oasis without the hassle of traditional gardening? My journey into raised garden beds began with a simple question: how can I grow more with less effort? The answer I found was both surprising and life-changing.
I discovered that raised garden beds offer a smarter way to garden. They allow for better drainage, reducing waterlogging and root rot1, and their elevated design makes maintaining your plants easier on your back. Plus, with sizes like 4×12 feet, they fit perfectly into almost any yard1.
Seeing the immediate benefits, I gifted my mother a raised garden bed, and she was amazed at how much more she could grow with minimal effort. It’s not just about convenience; it’s about results. These beds are designed with center supports for stability1 and can be built with materials like pressure-treated lumber for durability2.
Ready to get started? This guide is here to help you every step of the way, from DIY tips to essential resources. Whether you’re a seasoned gardener or just starting out, raised garden beds can make your gardening dreams a reality.
Key Takeaways
- Raised garden beds improve drainage and reduce root rot.
- They come in sizes like 4×12 feet for space efficiency.
- Using pressure-treated lumber increases durability.
- DIY construction is manageable with basic tools.
- Raised beds are perfect for both experienced gardeners and beginners.
Why I Love Raised Garden Beds
My journey into gardening wasn’t always easy. For years, I struggled with traditional in-ground methods, dealing with poor drainage and back pain from constant bending. It wasn’t until I discovered raised garden beds that everything changed.
My Personal Gardening Journey
I remember the frustration of watching my plants suffer due to waterlogged soil. It seemed like no matter how hard I tried, I couldn’t get the drainage right. Then, I stumbled upon raised garden beds. The difference was almost immediate. The soil drained perfectly, and my plants thrived3.
What really surprised me was how much easier it was on my body. Bending and kneeling for hours became a thing of the past. The elevated design made tending to my plants a breeze, and I noticed a significant reduction in back strain4.
How Raised Beds Transformed My Routine
Raised beds have completely transformed how I garden. The ergonomic design allows me to plant, care for, and harvest my plants without the physical toll. Plus, the consistent results I’ve achieved have been remarkable. My plants grow healthier, and I’ve noticed a reduction in weeds, making maintenance much easier4.
One of the most rewarding experiences has been seeing my clients achieve similar success. Many have reported improved accessibility and fewer gardening-related injuries after switching to raised beds. It’s incredible to see how such a simple change can make such a big difference4.
“Raised garden beds have been a game-changer for me. The ease of use and consistent results have made gardening a true joy.”
These beds have not only made gardening more enjoyable but have also allowed me to grow a wider variety of plants. The faster soil heating in raised beds has improved seed germination rates, giving me a head start on the growing season3.
Understanding the Benefits of Raised Garden Beds
Raised garden beds offer a multitude of advantages that can transform your gardening experience. From improving soil quality to enhancing accessibility, these beds provide a practical and efficient way to grow your favorite plants.
Improved Soil Quality and Drainage
Raised beds allow you to control soil quality more effectively, making it easier to incorporate rich compost for healthier plant growth5. The improved drainage system protects plants during heavy rains, preventing waterlogging and root rot. This feature is particularly beneficial for areas with clay soil, as it enhances moisture retention while maintaining proper drainage6.
Creating a raised garden also provides a level and focused growing area, ensuring even distribution of water and nutrients. This results in more robust plant development and better overall yields.
Enhanced Ergonomics and Accessibility
The elevated design of raised beds reduces the need for bending and kneeling, making gardening more accessible for people with back issues or limited mobility. This ergonomic benefit allows for a more comfortable gardening experience, encouraging longer and more enjoyable sessions tending to your plants.
Raised beds also warm up faster in the spring, giving you a head start on the growing season. This can extend your gardening period by up to a month, allowing you to harvest earlier and longer5.
“Raised garden beds have been a game-changer for me. The ease of use and consistent results have made gardening a true joy.”
Materials You Need for DIY Garden Beds
When it comes to building your own garden bed, the right materials make all the difference. Selecting high-quality lumber and wood is essential for durability and aesthetics. Here’s a breakdown of what you need to get started.
Choosing the Right Lumber and Wood Options
Opt for durable, rot-resistant woods like redwood or cedar7. These options can last up to 20 years, making them a worthwhile investment. Pressure-treated lumber is another safe choice for vegetable gardens8.
Essential Tools for a Successful Build
You’ll need a saw, drill, measuring tape, and safety gear. These tools ensure a smooth and safe building process.
| Material | Recommended Type | Benefits |
|---|---|---|
| Lumber | 2×6 or 2×8 Boards | Sturdy and weather-resistant |
| Wood | Redwood, Cedar | Naturally rot-resistant |
| Fasteners | Galvanized Screws | Resist rust and corrosion |
| Pest Control | Hardware Cloth | Prevents burrowing pests |
Using proper screws and hardware cloth ensures stability and pest prevention. Non-toxic sealers can extend the life of your bed7.
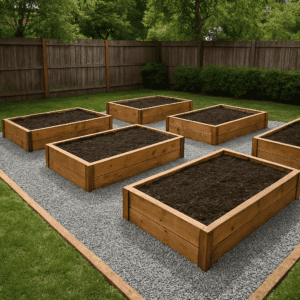
Planning Your Garden Layout
Before you start building, take the time to plan your garden layout meticulously. A well-thought-out design ensures your space is functional, efficient, and visually appealing. This step is crucial for maximizing your garden’s potential and making the most of your area.
Sketching Your Space Accurately
Start by sketching your garden area to visualize how your raised beds will fit. Measure your space carefully, noting any obstacles like trees or fences. Consider the mature size of your plants and leave enough room for pathways. A common mistake is overcrowding, which can lead to poor air circulation and reduced growth.
When designing, think about the flow of your garden. Wide pathways (at least 18-24 inches) make it easy to move between beds without stepping on plants9. This not only protects your plants but also makes maintenance more enjoyable.
Considering Sun Exposure and Seasonal Changes
Sunlight is a critical factor in garden layout. Most vegetables need at least 6 hours of direct sunlight daily, so place your beds where they’ll receive adequate light10. However, some plants like leafy greens may require partial shade, especially in warmer climates.
Seasonal changes also play a role in planning. In colder months, position beds to receive winter sunlight and protect them from harsh winds. In warmer seasons, consider shading strategies to prevent overheating. This thoughtful placement ensures year-round productivity.
| Bed Dimension | Recommended Size | Benefits |
|---|---|---|
| Width | 3-4 feet | Ease of access without stepping on soil |
| Length | 6-8 feet | Optimal space utilization |
| Height | 3 feet | Reduces back strain and deters pests |
Proper planning is a key step in creating a thriving garden. By considering your space, sunlight, and seasonal needs, you’ll set yourself up for success and enjoy a bountiful harvest.
Selecting the Ideal Location for Your Garden Bed
When selecting the ideal location for your garden bed, there are a few key factors to consider. The right spot can make a significant difference in the health and productivity of your plants.
Identifying a Level Surface
A level surface is crucial for your garden bed to ensure even water distribution and proper drainage. Start by assessing your yard to find a spot where the ground is naturally even or can be easily leveled. If the area is sloped, you may need to create a terrace or use retaining walls to level it11.
Sunlight is another critical factor. Most vegetables require at least 6 hours of direct sunlight daily, though some can thrive with as little as 4-6 hours12. Avoid shaded areas, especially those cast by trees or structures, as they can significantly impact plant growth.
Proximity to a water source is also important. Having a hose or water supply nearby makes maintenance easier. Avoid placing your bed in low-lying areas where water might collect, as this can lead to root rot and other issues11.
A common mistake is not considering the flow of your garden. Wide pathways (at least 18-24 inches) make it easy to move between beds without stepping on plants11. This not only protects your plants but also makes maintenance more enjoyable.
By carefully evaluating these factors, you can choose a location that maximizes sunlight, ensures proper drainage, and makes your gardening experience more enjoyable and productive.
Step-by-Step Guide to Building Your Raised Garden Bed
Constructing your own raised garden bed can be a rewarding DIY project. With the right approach, you can create a durable and functional space for your plants. Let’s break down the process into manageable steps to ensure a successful build.
Assembling Short and Long Sides
Start by assembling the short sides of your raised bed. This approach simplifies the layout and ensures a sturdy foundation. Use screws to secure the boards, making sure each corner is tightly fastened for stability13.
- Begin with the short sides to establish a solid base.
- Align the boards carefully and attach them using galvanized screws.
- Ensure each corner is secure to maintain a square shape.
Next, attach the long sides to the short sides. This step requires precision to keep the structure square and level. Proper alignment is crucial for the overall integrity of the bed14.
- Align the long sides with the short sides, ensuring they are even.
- Use screws to secure the long sides, checking the corners for tightness.
- Double-check that the bed is level and sturdy before moving on.
Following a methodical, step-by-step process ensures your raised bed is both safe and functional. By starting with the short sides and carefully attaching the long sides, you’ll achieve a professional-looking result. Remember, precision in each step leads to a durable and long-lasting garden bed15.

Installing Hardware Cloth and Weed Barriers
Protecting your garden from pests and weeds is essential for a thriving harvest. Installing hardware cloth and weed barriers can help maintain the health and productivity of your plants. These simple additions create a protective layer that deters unwanted visitors and reduces maintenance.
Techniques for Secure Attachment
To ensure long-term protection, start by attaching hardware cloth to the bottom of your raised bed. Cut the cloth to fit snugly, ensuring there are no loose areas where pests might enter. Secure it tightly with galvanized screws or wire, making sure the edges are sealed to prevent any gaps16.
A well-secured hardware cloth prevents burrowing pests like gophers and moles from accessing your soil. This protective barrier not only keeps pests out but also allows earthworms to move freely, enhancing soil fertility17.
Keeping Burrowing Pests at Bay
Burrowing pests can damage plants and undermine soil structure. Hardware cloth is an effective solution, as it allows beneficial organisms to pass through while keeping pests out. For added protection, consider using a combination of hardware cloth and landscape fabric18.
Burlap sacks or cardboard can also serve as weed barriers. These materials block weed growth and retain moisture, creating a conducive environment for plant roots. They eventually break down, enriching the soil naturally17.
Methods for Installing Weed Barriers
Weed barriers reduce competition for nutrients and minimize maintenance. Landscape fabric is a popular choice, as it prevents deep-rooted weeds while allowing water and nutrients to reach your plants. Cut the fabric to size and secure it with rocks or soil18.
For a more eco-friendly approach, use layers of newspaper or cardboard. These materials suppress weeds and retain moisture, improving soil health over time. They decompose naturally, adding organic matter to the soil16.
| Material | Benefits | Installation Tips |
|---|---|---|
| Hardware Cloth | Prevents pests, allows earthworms | Attach tightly to the bed’s bottom |
| Landscape Fabric | Blocks weeds, permits water flow | Secure with rocks or soil |
| Burlap/Cardboard | Suppresses weeds, retains moisture | Layer before adding soil |
By combining hardware cloth and weed barriers, you create a robust defense system for your garden. This not only protects your plants but also enhances soil health, ensuring a bountiful harvest for years to come.
Measuring and Cutting Lumber Accurately
Accurate measuring and cutting are the foundation of a well-constructed raised bed. Taking the time to ensure precise measurements will save you from costly mistakes and ensure your project turns out as planned.
Pre-Sealing Tips for Longevity
Before you start cutting, consider pre-sealing your lumber to enhance durability. This step is especially important for outdoor structures, as it protects the wood from moisture and extends its lifespan19. Use a food-safe wood sealer to ensure it’s safe for your plants.
Using the Right Tools for Precise Cuts
The right tools are essential for clean, accurate cuts. A miter saw or circular saw is ideal for making straight cuts, while a measuring tape ensures precision. Remember, a 2×6 board is actually 1.5 inches by 3.5 inches, not the nominal 2×6 inches19.
- Use a miter saw for precise angled cuts.
- Measure twice and cut once to avoid errors.
- Wear safety goggles to protect your eyes.

By following these steps, you’ll achieve professional-looking results. Remember, patience and precision are key to a successful raised bed project.
Building for Durability: Reinforcements and Supports
When it comes to creating a long-lasting raised bed, durability is key. Without proper reinforcements, your structure might not withstand the elements or the weight of the soil and plants. This is where galvanized steel braces and strong corner supports come into play.
Using Galvanized Steel Braces
Gone are the days of sagging sides and uneven structures. Galvanized steel braces are an excellent addition to your raised bed, providing the extra support needed, especially for the longer sides. These braces are resistant to rust and can withstand harsh weather conditions, ensuring your bed remains sturdy for years to come20.
Adding Strong Corner Supports
The corners of your raised bed are crucial for maintaining its square shape. By adding extra corner supports, you ensure that the structure remains stable and doesn’t bow under pressure. This is particularly important if you’re using heavier materials or deeper soil layers21.
Practical tips for securing these supports include using galvanized screws or wire to attach hardware cloth tightly to the bed’s bottom. This not only prevents pests but also ensures there are no gaps for them to enter20. The result is a robust defense system that protects your plants and maintains the integrity of your raised bed.
By incorporating these reinforcements, you’re investing in a structure that will serve you well for many growing seasons. The added stability and protection mean you can focus on what really matters—enjoying your gardening journey and reaping the rewards of your efforts.
Finishing Touches: Sealing and Protecting Your Garden Bed
After building your raised bed, it’s important to protect it from the elements and ensure it lasts for years to come. Sealing your wood is a crucial step that not only extends the life of your structure but also maintains its appearance22.
Choosing Food-Grade Wood Sealers
Selecting the right sealer is essential, especially if you’re growing edibles. Opt for a non-toxic, food-grade wood sealer to avoid harmful chemicals leaching into the soil. Products like tung oil or milk paint are excellent choices as they are safe and eco-friendly23.
Applying Sealers Post-Assembly
Apply your chosen sealer after assembling the bed. Start with a wood stabilizer to create a waterproof barrier, followed by a deck & fence formula for optimal appearance. Two coats are recommended for lasting protection, allowing proper drying time between coats22.
- Use a pump sprayer for even coverage.
- Reapply annually to maintain protection.

Regular maintenance ensures your raised bed remains in great condition, providing a beautiful and functional space for your plants to thrive.
Cost Considerations for Your Raised Garden Bed Project
Planning a budget for your raised bed project is crucial to ensure you stay on track financially. The costs can vary widely based on the materials and size you choose. Let’s break down the key expenses to help you plan effectively.
Budgeting for Lumber and Materials
Lumber is one of the biggest expenses. The cost of quality lumber can range from $36.57 for a 2x12x8’ rough sawn cedar to $67.99 for 4x4x54” cedar posts24. If you’re opting for a DIY approach, the total cost can exceed $300, especially when considering tools and potential mistakes25. Premade kits, on the other hand, range from $100 to $600, offering a convenient but potentially more expensive option25.
Weighing Bulk Soil versus Bagged Options
Soil is another significant cost. Bulk soil can be more economical for larger beds, while bagged soil is convenient for smaller projects. A standard 4’x8’ bed might cost around $7.70 for ground cover, but if you’re using high-quality bagged soil, the expense can add up quickly26.
To keep your project within budget, consider upcycling materials or opting for durable, long-lasting options like galvanized steel, which can last over 20 years25. Remember, while initial costs might seem high, a well-built raised bed can last 10 to 20 years, making it a worthwhile investment25.
Adapting Your Build to Different Garden Sizes & Shapes
Adapting your raised bed design to fit your garden’s unique space is key to maximizing its potential. Whether you have a small backyard or an expansive area, customizing the size and shape of your beds can enhance both functionality and visual appeal.
Customizing Bed Dimensions
The ideal width for a raised bed is approximately 3 to 4 feet, as this allows easy access without stepping on the soil27. For longer beds, a 6 to 8 feet length is recommended, depending on your garden’s space27. The height should be around 3 feet to align with average knee height for comfortable gardening27.
- Width: 3-4 feet for easy access
- Length: 6-8 feet for space utilization
- Height: 3 feet for ergonomic access
Creating Continuous Garden Rows
For a cohesive look, consider creating continuous garden rows. This arrangement not only enhances accessibility but also improves sunlight distribution, with most vegetables needing 6 to 8 hours of direct sunlight daily28.
- Arrange beds in rows for a unified appearance
- Ensure pathways are at least 18-24 inches wide

Troubleshooting Common DIY Raised Bed Issues
Building a raised bed can be a fun project, but it’s not always perfect. Let’s tackle some common issues and how to fix them.
Common Challenges and Solutions
One of the biggest problems is bowing sides. To fix this, make sure your boards are well-aligned and secured tightly with galvanized screws29. If you notice shifting boards, check the corners and tighten any loose screws.
Misaligned corners can weaken your bed. Use a carpenter’s square to ensure everything is straight. If it’s still off, adjust the corners gently and secure them again.
Preventing Future Issues
- Always double-check your measurements before cutting lumber.
- Use a level tool to ensure your bed is even.
- Apply wood sealer after assembly to protect against moisture.
By addressing these issues early, you can enjoy a sturdy and functional raised bed for years to come.
Maintenance Tips for Year-Round Gardening Success
Keeping your raised bed in top shape requires consistent care. Regular maintenance ensures your plants thrive and your structure lasts for years. Let’s dive into some essential tips to keep your gardening efforts fruitful all year round.
Seasonal Soil Amendments
Soil health is the backbone of any successful gardening endeavor. Start by amending your soil seasonally. In the spring, mix in compost to replenish nutrients after winter30. During the fall, add organic mulch to retain moisture and suppress weeds, which also helps regulate soil temperature during the summer months30. For colder seasons, incorporate compost to improve soil structure and replenish nutrients for the next growing season30.
Preparing for Extreme Weather
Protecting your plants from extreme weather is crucial. Use row covers or cloches to shield them from frost, especially during spring temperature fluctuations30. In areas prone to heavy rain, ensure your raised bed has proper drainage to prevent waterlogging. For dry spells, maintain consistent moisture levels, as raised beds drain more quickly than traditional gardens30. Consider using cold frames or mini-greenhouses to extend the growing season into winter30.
- Amend soil seasonally for optimal nutrient levels.
- Protect plants from frost with row covers.
- Monitor soil moisture during hot, dry seasons.
By following these maintenance tips, your raised bed will remain a productive and thriving space throughout every season. Remember, consistent care leads to consistent results!
Extra Tips for an Ergonomic and Efficient Garden Setup
Designing a garden that’s both beautiful and functional can elevate your gardening experience. By focusing on ergonomic layouts and efficient spacing, you can create a space that’s not only productive but also a joy to work in.
Designing Functional Paths and Spacing
One of the most important aspects of a well-designed garden is the pathway system. Wide, accessible paths make it easier to move around your garden without damaging plants or straining your back. Aim for pathways that are at least 18-24 inches wide31, ensuring they’re comfortable to walk on and allow easy access to every raised bed.
When planning your raised bed layout, consider the mature size of your plants and leave enough space between them for proper growth. A common mistake is overcrowding, which can lead to poor air circulation and reduced plant health. For example, tomato plants should have at least 18 inches of space between them, while larger varieties may need up to 2 feet32.
The height of your raised beds can also play a role in ergonomics. Beds that are 3-4 feet wide allow easy access from all sides without stepping on the soil32. This not only prevents soil compaction but also makes it easier to reach every part of the bed. If you’re looking for added accessibility, consider beds that are 16.5 inches tall, which is ideal for knee-level access33.
- Plan pathways that are wide enough for easy access (18-24 inches).
- Leave enough space between plants for proper growth and air circulation.
- Consider the height of your raised beds for ergonomic access.
By thoughtfully designing your garden’s layout, you can create a space that’s both functional and visually appealing. Proper spacing and ergonomic design will make your gardening routine more efficient and enjoyable, allowing you to focus on the joy of growing your own plants.
Conclusion
As I reflect on my journey with raised beds, I’m reminded of the transformative power of smart gardening solutions. These beds have not only simplified my gardening routine but also enhanced the health and productivity of my plants34. The ability to control soil quality and drainage has been a game-changer, especially for someone who once struggled with poor soil conditions34.
Every moment spent planning and building your raised bed will pay off. Whether you’re a seasoned gardener or just starting out, the benefits of raised beds are undeniable. They offer improved drainage, reduced weed growth, and increased accessibility, making gardening more enjoyable and efficient35. Plus, with proper setup, you can enjoy a longer growing season and faster soil warming in the spring35.
Take the time to build your own raised bed, and you’ll see how it transforms your gardening experience. Over the coming year, you’ll enjoy higher yields, less maintenance, and the satisfaction of growing your own food. It’s an investment that will reward you for many seasons to come35.
In closing, I encourage you to take action and start your raised bed project today. Trust me, the effort you put into creating this space will be worth it. Happy gardening!
FAQ
What are the best materials for building a durable garden bed?
Cedar lumber is an excellent choice because it’s naturally rot-resistant and insect-repellent. You can also use pressure-treated wood, but make sure it’s safe for gardening. Always opt for untreated wood if you’re growing edible crops.
How do I keep weeds from growing in my garden bed?
Install a high-quality weed barrier at the bottom of your bed before adding soil. Cut the barrier to fit snugly, ensuring it covers the entire area. Secure it with hardware cloth or landscape pins for lasting protection.
What’s the ideal size for a garden bed?
Aim for a bed that’s 4 feet wide and 6-8 feet long. This size allows easy access from both sides without stepping on the soil, which helps prevent compaction and makes planting easier.
How deep should the soil be in my garden bed?
A minimum depth of 6 inches is recommended, but 8-12 inches is ideal for root growth. Fill the bed with a mix of topsoil, compost, and organic matter to create a fertile environment for your plants.
Can I use hardware cloth to protect my crops from pests?
Yes! Hardware cloth is a durable mesh material that keeps burrowing pests like moles and gophers out. Line the bottom of your bed with it before adding soil for added protection.
How often should I water my plants in a raised bed?
Water deeply once or twice a week, depending on weather conditions. Check the soil by inserting your finger up to the knuckle; if it feels dry, it’s time to water. Avoid overwatering to prevent root rot.
What tools do I need to build a garden bed?
You’ll need a saw, drill, screws, measuring tape, and a level. A square can also help ensure corners are properly aligned. Safety gloves and goggles are a must for protecting yourself while cutting and assembling.
How do I ensure my garden bed is level?
Use a spirit level to check both the length and width. If the ground is uneven, add or remove soil until the bed is perfectly level. This ensures proper water distribution and even plant growth.
Can I grow crops year-round in a raised bed?
Yes! In cooler seasons, plant hardy crops like spinach, kale, or carrots. In warmer months, switch to tomatoes, peppers, or cucumbers. Use row covers to protect plants from extreme temperatures and frost.
How do I prevent my garden bed from rotting over time?
Use rot-resistant materials like cedar or redwood. Apply a food-grade sealer to the wood before assembling the bed. Avoid using railroad ties or treated lumber if growing edible plants.
What’s the best way to fill a raised bed?
Start with a 2-inch layer of gravel for drainage, followed by a weed barrier. Fill the rest with a mix of topsoil, compost, and organic matter. Avoid using pure compost, as it can compact over time.
How do I keep my garden bed looking neat and organized?
Add a trellis for climbing plants, use mulch to retain moisture, and keep pathways clear. Regularly inspect the bed for signs of wear and make repairs as needed to maintain its structure and appearance.
Read about Bucket Gardening: Planting Vegetables in Containers